Sunday, December 4, 2011

Crib bumpers: what I learned.

I never used crib bumpers when Violet was a baby.  Technically, the American Academy of Pediatrics doesn't recommend them because the baby can roll into them while it is sleeping and suffocate on them.    However, when Violet was about 6 months old, she started doing this:
 Yep, that's Violet with her legs wedged between the crib slats.  When she was first learning to crawl, she would only go backwards and then this would happen.  At that point I started wishing that I had bumpers.  But I never got around to making any.

Until this pregnancy.  This is what I did with my on-sale designer fabric.  I love how they turned out.  I feel like they are gender-neutral enough to use with either a boy or a girl, since I don't know which I'm having.


They weren't as easy as I had planned.  I underestimated how many ties I would need (I ended up using 8 for each long side and 4 for each short side).  I also bought thick satin ribbon for the ties.  It looks pretty, but thinner, coarser ribbon is actually easier to tie.  I also didn't think about how expensive foam is (to fill the bumpers).  I resorted to cutting up an old foam mattress pad and  using that as the filling.  It actually works quite nicely.

I should let you know that you probably won't be saving any money by making these yourself.  You can find ones that aren't too expensive online.  But if you want to be able to customize the fabric and make them exactly match your room, this is the way to go.  Besides, if you buy them, you won't have the frustration of messing up and redoing fulfillment of making these on your own.

And as for the safety part of these, I have decided that if the baby starts to roll (which Violet never figured out how to do), then I will take them out.  Just to be safe.  But I have no reservations about putting them back in the second this kid learns how to crawl backwards.

Wednesday, November 9, 2011

Online store rave

I don't normally go for designer labels.  The budget-consious side of me simply will not let myself be won over by a brand name.  I do, however, LOVE designer fabrics.  (Amy Butler, anyone?)  Maybe it's because they're not really any more expensive than normal fabrics.  The only problem is that I can never seem to find designer fabrics in fabric stores; only online.  And I don't like buying fabrics online.  I like to be able to see and feel the fabric before I purchase it.  I like being super specific with how much I tell the lady at the cut counter to cut for me (I've been known to have them hold it up for me and show me what 1/2 yard would look like, and so on).  I like using the coupons that let you get anything in the store for 40% off.  And most of all, I hate paying for shipping and having to wait 4-7 business days before I can start sewing.

Okay, maybe I'm high-maintenance.  But I was able to let that all go today.  Today I found a site called quilthome.com.  It looks like any normal fabric site, and the prices are almost identical to other sites (because apparently someone decided that $8.75 per yard is the golden number for designer fabrics, and they seem to cost that much no matter what site you go to.)  But, they do have a huge selection of designer fabrics and if you look at the right side of the page, they have a bar that says "Specials" where you can get fabrics for up to 60% off.  These aren't fabrics that are on clearance because they're too ugly to sell, either.  The specials change every day.  Above that, they have a coupon special that changes daily.  They also let you purchase in half-yard quantities.

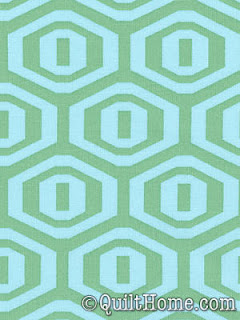
I was able to get this fabric for $3.58 per yard (normally $8.75)

I ended up saving so much money that I got coordinating fabric ($4.03 per yard) for the same project.  I had planned on just going to a fabric store and buying something solid to go with the fabric, but I'm pretty sure this is a better deal.
After that, I didn't mind spending the money on shipping.  Score.

Thursday, November 3, 2011

Fancy little dress

Remember the dress I made for my anniversary?  I had a ton of leftover fabric from it.  For Violet's birthday I threw together this cute, fancy dress.  I put a liner in it (which I had never done before) so it was kind of tricky, but I'm glad I did because the fabric is not super soft.  I also added some sheer sequined fabric to the skirt to make it look less plain. 
 The flowers required a LOT of cutting and hand-stitching.  I hate hand stitching. 

 And I found the perfect buttons for the back. 
I can't wait for her to try it out on Sunday!

Monday, October 31, 2011

Happy Halloween! Costume review

I'm not sure I will ever buy a Halloween costume.  I mean, is there any other day of the year where you can just go nuts with creative sewing?  I think not.  Here's the lineup from this year.

Violet was a chicken.  My inspiration for her costume was her yellow, feathery hair.  I just sewed some felt feathers to a yellow onesie and stitched a feather boa around the neck.  The shiny pants were actually made by her dad.  He did a great job.
 And I was a cow.  I felt that it was an appropriate getup for a pregnant woman, and it went well with the chicken.  Plus, it was super easy.  I made an udder out of some pink fleece and sewed it onto a white shirt.  My husband made me a cute little ribbon that buttons in the back to hold my cow bell.  I also wore some devil horns that were spray-painted to make them look more like cow horns, even though they're not in this picture.
I suppose I could have painted black spots on my clothes, but I didn't want to ruin the shirt.  I would have done it if I had a cheaper shirt to do it on.

Oh well.

Sunday, October 23, 2011

Maternity dress (sort of)

A couple of months ago, I inherited some clothes that my sister didn't want anymore.  Among those was this cute white dress, which at the time had no sleeves and a see-through-ish part that went a little too far down on the chest area.  All I had to do was make some sleeves for the arms and a bib for the chest and sew them in.  That's the great thing about white clothes; I always have fabric to match!  Anyways, I put a sash with it and it turns out that it fits me as a maternity dress.
 I did have "before" pictures, but I guess I deleted them before uploading them.  Oops.  And I know these pictures are cropped really weirdly, but it's because I am 7 months pregnant and having major body image issues.
My only question is, if this fits me NOW, when I'm 7 months pregnant, why did my size 00 sister ever buy it in the first place? 

Wednesday, October 12, 2011

Flower tee

This project consisted of a plain blue tee, purple fabric that had been ruffled up and sewn onto the tee in a circle, and gray fabric sewn on in the shape of a stem.  The only hard part about it: getting Violet so sit still for a picture.

Tuesday, October 4, 2011

Houndstooth skirt for fall

Last Christmas I made Violet a cute little pleated skirt.  Unfortunately she grew out of it before it was even washed.  So, I tried again with a new fabric.  I gave Violet a choice between brown and pink plaid and houndstooth.  I thought she would go for the more colorful one but when she saw this one, she literally gasped and yelled, "Blackwhite stars!"

It was pretty simple-- a pleat in the front, pleat in the back, a waistband, and some elastic.  I lined it so that it wouldn't be so itchy.

 It turned out pretty cute.  The fabric is really thick and I don't like the way it bunches in the back, but that's mainly due to the fact that I made it a little big so that she could grow into it.

Saturday, September 17, 2011

Polo shirt to dress

My dad is so sweet. A few months ago he gave me this purple polo shirt that had gotten too short for him.  His idea was for me to wear it as a maternity shirt.  Instead, I got really excited and said, "I think I'm going to make Violet a dress out of this!" And he gave me a look that said, "You're crazy, but do whatever you want."  So I did.

I cut out a little dress pattern while trying to use as many of the existing  hems as I could. I couldn't decide if I wanted to do buttons or a zipper (I hate them both) so I just made the neck big enough for her head to fit through.  I made the sleeves out of the sleeves from the shirt and added some embellishments from fabric from another shirt I had.  It worked perfectly. 

Thursday, August 18, 2011

DIY art

Last week we actually had a pintucksandruffles reunion.  I flew out to see Brittany and help her get her new place set up.  We didn't do anything too exciting besides paint and shop, but we did have a lot of time to think about home decor.

And I started thinking about art.  I love to paint, although I don't do it nearly as often as I should.  But when people find this out about me, I always get the same response: "How cool!  I wish I was aristic."  And I always want to say, "Well, you play the piano, don't you?  I bet your mom made you practice every day when you were little.  And you probably weren't good right away.  And I really bet that if you practiced painting every day, you'd be much better at it than I am."  But for some reason, not many people enroll their children in art lessons or make them participate in an art team that travels from school to school and competes.  That enthusiasm is saved for music and sports.

So, why not try it?  I put some pictures here that wouldn't require much skill.  Sunsets are always easy.  I did a sunset once and it took me three hours.  And I painted it with a knife.  The middle picture is a litle more complicated but when you look at it closely, it's just a bunch of vertical stripes and dots on a blue and brown background. And the last one-- seriously, anyone could do that.  If you don't have a lot of technical skill you can always call it abstract.  Don't have any good ideas?  Just copy something you like.  (I went to a lecture by an art critic once-- he said real artists do it all the time.)

by Wendy Puerto


by papermoth on etsy
Happy painting.  I promise, it feels awesome when you finish one.

Tuesday, August 2, 2011

Fabric dressing room

This summer I have been helping my mom decorate the "play room" for the grandkids.  We decided that we wanted a little screen for the kids to change behind when they play dress-up.  At first I envisioned a painted plywood wall, but I remembered how kids like to knock things over.  And then I envisioned a trip to the emergency room to suture a dressing-room-induced wound from it being pushed onto one of the kids.  Not such a good idea after all.
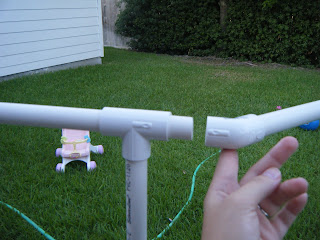
And then I remembered PVC pipe. It's light, easy to cut, has ready-made joints, and rarely injures people (unless you make a potato gun out of it, but that's entirely different.)  So I headed to Lowes and concocted this frame, using four 4' segments, two 2' segments, four 1' segments, four t-joints, four 45 degree joints, and four 90 degree joints.

 This was the only tricky part.  They didn't have a 45 degree t-joint, so I had to use a plain t-joint and attatch a tiny peice to connect it with a 45 degree elbow joint.  It worked out just fine.
 Then I sewed up some curtains that were easy enough that they don't even need an explanation.
It's going to look so cute in our lemon parfait-colored room.  Ahhh, PVC pipe.

Tuesday, July 19, 2011

a short story


So during Thanksgiving break last year, some friends (Katelyn and Leslie) and I decided to make the 2.5-hour drive down to Colonial Williamsburg to learn a little bit about our nation's history live a childhood fantasy of visiting the home of an American Girl doll.  As it turns out, Colonial Williamsburg is supremely boring, but the trip was totally worth it because just as we stepped out of the car, we saw an eight-year-old girl not only carrying her American Girl doll, but dressed in an American Girl costume!  We may have stealthily (read:  slightly creepily) taken her picture.

Then I found this website (offering free American Girl dress patterns).  I totally know what Katelyn and Leslie are getting for their birthdays this year.  (And I may even try my hand at making a life-sized version as well.)

Monday, July 18, 2011

gingham dress and other projects.

Here are the pictures of the gingham dress I made.  I still think it needs to be tweaked just a little bit, but not a bad start.


I also happen to own about 18,000 yards of gray jersey material, so I am working on making myself a new wardrobe made entirely of gray jersey.  Most of my inspiration came from Anthropologie.  I will post pictures as I finish each one.  Sewing has been slow as of late, what with all of the sitting by the pool and reading books that I've been doing.  Super important stuff, I know....


Wednesday, July 13, 2011

okay, okay

My funk is over, I suppose.  A long time ago, I came across a picture of this dress (also very similar to this one from Shabby Apple) and really wanted it.  But alas, it was $450.  (I probably should have expected that since Lauren Conrad was seen wearing it.  I'm still not quite sure who she is, but apparently she's famous.)  I, however, am not famous so I decided to save some money and make my own.


It turned out just a little shorter than I had wanted (but there's a large hem that I can easily take out) and the original sleeves were way too poofy and had to be altered, but other than that I am pretty happy with the final product.  Unfortunately, I do not have any pictures (yet) but tomorrow I post some.

Tuesday, July 12, 2011

hiatus

I have taken a bit of a sewing hiatus in the past month.  Besides doing some hemming and mending for coworkers and taking in some shirts and skirts, my sewing machine has been oh, so quiet.

And then today I suddenly had the urge to sew something beautiful.  But then I looked at my fabric pile and realized that I had no idea what I wanted to make.  I need to make a trip to the fabric store soon.  So instead, I am perusing sewing blogs and clothing catalogs for some sort of inspiration.  I lost my groove and am looking to get it back.  Just call me Stella.  (haha)

Monday, June 20, 2011

Wire-wrapped ring

I may have mentioned before that my husband is a geologist.  A couple of years ago he went on a field trip and came home with a large chunk of mud. (This is not an unusual occurence.) But it wasn't just any mud, it was mud with pyrite in it.  So we put it in a bowl and covered it with water and spent the next couple of days sticking our hands into it and fishing out what turned out to be hundreds of little pyrite crystals.  And as cool as they are, they just sat in a bowl for the next 2 years.

Then a couple of weeks ago I was at Urban Outfitters and I found a pyrite ring.  And their pyrite was not even as pretty as our pyrite.  So I obviously had to make a ring out of our pyrite that was way cooler than theirs.  Here's how I did it:
 I started out with about 2 feet of wire and wrapped it around something slightly bigger than my finger (in this case, a tube of lip gloss).  There was still plenty of wire left on each end.
 Then I positioned the pyrite in the middle of the ring and wrapped the wire around it.  I kept wrapping around the rock and around the ring until it felt secure.
 I wrapped the leftover wire around the round part of the ring several times.  Then I just clipped the wire and clamped it down so that it wouldn't poke out.
 Here is the finished product.  It definitely has that earthy, homemade look, which really works for it since it's just a rock that we fished out of a peice of mud.  I love it.

Monday, June 13, 2011

How I made the dress (finally)

Sorry, guys.  My computer and I had several fights last week and my attempts to post were all in vain.  Fortunately, we are getting along now so here is the very rough tutorial for the dress.
Here are the peices for the bodice.  As you can see on the back two, I sewed a little bib on the inside for extra support.  Another weird thing is that I didn't cut the peices out all at once.  I cut the bodice, then when I was sure it fit right, I cut the midriff panel, and so on.  That way if I have to alter something, it's only one section, and not the whole dress.
 After sewing the bodice peices together, I did a gathering stitch right under the bust.  If you're not sure where you should put it you can just try it on and draw little contour lines under your bust. Worked for me.
 Then I sewed on a big chunk for the midriff panel...
 And sewed a gathered 12" wide strip of tulle to the midriff, like a sash.  It ended up being my favorite part of this dress.
I did a gathering stitch for the skirt and attatched it to the midriff panel. 
The only thing left after that was attatching the invisible zipper, attatching the sleeves, and hemming.  I'm not going to show pictures of those steps because I absolutely hate those steps and I'm pretty sure I did them wrong anyways.  I'm just telling you about them so you don't think I wore a sleveless, backless, unhemmed dress out to dinner.
 
Not bad for less than $20.

Tuesday, June 7, 2011

Happy anniversary! How about a dress?

Earlier this month I kept thinking that my anniversary was on Monday.  It wasn't. My husband actually had to remind me that it wasn't.  On our real anniversary, though, he scored major points by getting me peonies.  They were the flower that I requested for our wedding, but my florist said that they would be out of season.  She was wrong.
 
 But since we hadn't ever gone out by ourselves for our anniversary, I decided to go all out and make this dress.  From scratch.  Without a pattern.  It kind of made me feel like superwoman (in Cindarella colors, of course).
 Yep, we had a great time.  And I totally stole my mom's necklace to wear with the dress.
I made a rough tutorial for it, so that will come soon!