Tuesday, May 31, 2011

coming soon....

For those of you who have been waiting, I have finally (I know, I know...  sorry) posted a full tutorial for the Kate Spade Flower Tank.  I had no idea so many people would want to make it.   My bad. But it is there!  Go check it out.  And then make one (or three) for yourself.


Also, remember back in April when I promised a tutorial for making this Anthropologie shirt?  Yup.  That's coming tomorrow.  Promise.   (um, what exactly happened to May?  I don't really remember any of it.)


And, even better, I am working on a knockoff of this Kate Spade Striped Jersey Dress.  I love stripes.  I love jersey.  And I definitely love Kate Spade.  So you can't go wrong here...  (Mine's going to be shades of gray, because that happens to be the color of the Old Navy dress I bought for the sole purpose of cutting up and turning into something cuter.  Mission accomplished.

Tips for taking pictures of food

Let's get one thing straight: I don't claim to be a photographer. Or a food blogger. Or even a good cook. But every once in awhile, when a meal turns out just right, I want to take a picture of it. And I've noticed that thousands of other people like to do the same thing. But there's one problem: food is surprisingly hard to photograph. I can't be the only one who has noticed this. It's really frustrating when you have this perfect little dish in front of you but the only thing that turns out on the camera is something sloppy and just un-appetizing.  And I know this happens a lot because I look at recipes that people post and see pictures like these:


 Gross.  There's no excuse for that, people.
The first thing I found out when photographing food is that it almost always looks better if you turn off your flash.  Compare this first picture of my coconut cakes to the second.  The second looks way more appetizing, right? 

 Food just needs natural light. Or big, expensive studio lights, which I am not about to buy.  If you can't get a focused picture with your flash off, try steadying the camera with a tripod.  You can also use one of these reflectors to use the existing light to "spotlight" the food. You can find them for about $20 on Amazon.
 But the easiest way to get natural light on your food is to just take it outside.  I put this one on the porch of my little apartment.  (Yes, I'm totally not above putting food on the ground.) I had to swat Violet's hands away as she tried picking at the pasta, but it was worth it.  You can still see her little foot in the background.
 This last picture was taken in front of a big bay window and it still turned out a little gray.  Luckily, you can adjust the brightness and contrast using almost any photo editing software these days. 
Hopefully with a little practice, the challenge of photographing food will become a little easier.

Monday, May 30, 2011

Ribbon Shoulder Tee

I was recently accused of not being a real seamstress.  (Rude, right?  But also oh, so true.)  Let's be honest here, people.  I received my first sewing machine on November 29, 2010.  It was a present from my mom for my birthday.  She was feeling kind of sorry for me at the time and would have bought me a pony if I had asked for it.  (Too bad I didn't think of it at the time.)  So no.  I am not a real seamstress.  I cheat.  I copy the pros from JCrew and ShopRuche and other such places and steal their ideas.  As a teacher, I probably should be ashamed, but I'm not.  (Apparently I've been lying to my students when I tell them cheating will never really get them anywhere.  It will, in fact, get them 49 (49!!!)  whole followers on their blog.)  

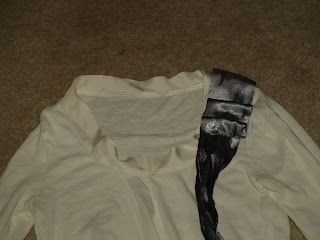
This shirt, however, I came up with all on my own.  Just to prove that I could.  Start with a plain shirt and a thick satiny ribbon (I believe mine was 3 inches thick.)  Sew the ribbon to the shoulder seam of the shirt, like so:


Fold the ribbon down and make a couple of pleats.  Accuracy is not important.  Make them as big or small as you like them. Stitch these pleats into place.


You should have lots of extra ribbon hanging off the end of your pleats.  Chop this off.  You will use this to make your bow:


Cut two strips of ribbon about 4 inches long to make the ends of your bows.  Stitch them to the shirt, directly over where you first cut our ribbon:

(It's going to look kind of messy at this point, but don't worry!  It's about to be covered up by a bow.

To make your bow, take a long strip of ribbon and fold the ends in on each other:


Then take a short strip of ribbon and wrap it around where the two ends meet. (Sorry, forgot to get a picture of this part.  My bad.)  I used Liquid Stitch to hold it in place.


  Once the liquid stitch has dried, sew the bow onto the shirt, making sure to cover all of the jagged cut areas.  
(Notice how you have two angles of the shirt in the same picture?  Sometimes I astound myself with my photography skills.  Also notice that I am wearing a running skirt.  Don't worry, I hadn't gone for a run yet, so I am still nice and clean (and happy) in this picture.)

Sunday, May 29, 2011

faves

I am a closet product junkie. (Well, apparently an open product junkie now, but whatever.  That's beside the point.)

The point is, I love trying new beauty products.  Hair, makeup, skincare, you name it.  This is why it's so necessary that I scour the clearance racks.  Otherwise, my meager teacher's salary would all be eaten up by shampoo.  And that would just be embarrassing.

Now, (since you have waited so patiently) let me present you with my current faves:

Bare Escentuals Pure Transformation Night Treatment:  I actually don't use this as a night treatment.  I use it as a foundation.  And holy moly, it makes my skin feel so wonderful and beautiful that I could marry it.  This is the only product I will pay full price for ($60.  yikes!) but it is SO worth it.


Joico Bodyluxe Thickening Shampoo:  Pretty much anything by Joico is awesome, and Trade Secret had almost all of their products on sale (80% off).  I bought one bottle of everything.  And then went back the next day and cleared the shelves.


Joico Humidity Blocker:  If you live somewhere humid this is awesome.  (And um...  I do.  DC is humid, people. And pretty dang hot in the summer.) I once walked through drizzle to get from my car to my classroom (and since I am a newer teacher, I have to park all the way down by the tennis courts.  Lame-o.) When I got inside, I headed straight to the bathroom, expecting it to be a ponytail day.  But lo and behold, my hair looked just as good as it had when I left the house that morning!  These are magical powers here.  (Actually, it's all just Chemistry, but still.  Magic sounds cooler.)


Joico Texture Spray:  Gives my hair a textured, piece-y look that have always wanted but had always alluded me.  Plus, it smells pretty.


Sea Salt Spray:  Made by me.  Creates nice, thick, wavy hair.  Which is really all I have ever really wanted out of life.

Freeman FREEM Beaut Pl of MK LT 6oz Cuc
Freeman Cucumber Peel-off Mask.  There's just something satisfying about feeling a fresh layer of clean skin underneath all of the gunk that tends to build up.  And this one is so cheap I don't even need to buy it on sale. (Gasp, I know.)

Friday, May 27, 2011

emma pillsbury cardigan knockoff

Are you a Gleek?  I have to admit that I am not.  Never even seen the show.  But I have heard enough about it to know that the school counselor (Emma Pillsbury) is very well-dressed.  So I occasionally peruse the website www.wwepw.com (What Would Emma Pillsbury Wear).  Chances are, if she would wear it, so would I.  So I found this fantastic cardigan that I knew I needed one.  (And no, I do not use the word "need" lightly.  It was a necessity.)


This particular cardigan is blue and yellow, but since I didn't have a suitable navy cardigan, I went with plum.  And the great thing about this tutorial is that the process can be used for any other embellished item you might want to copy.

Start with a basic crew-neck cardigan and some yellow scrap fabric:


Next, pull up your picture of the cardigan on your computer.  Zoom in on the separate designs and print.  (The design will end up very fuzzy and pixelated, but you can get a good general idea of the shape you want.) Cut out these shapes, and you have a pattern for your yellow flowers.

Pin the shapes onto the yellow fabric and cut.  Using your picture as a guide, pin the pieces into place and stitch onto the cardigan.  (I would do this one at a time- I kept poking myself with stray pins as I was sewing. Kind of annoying.)


I wore it with the yellow skirt that I recently dyed and, in true Emma Pillsbury fashion, a ruffly button-down.  (SO glad I left the top of the skirt white. The yellows on the cardigan and the skirt match perfectly!)

Nursing cover tutorial

I'm pretty sure that most people who read this blog already have one of these.  I mean, it's not the most creative thing in the world.  I've seen free patterns for them online, but I consider using a pattern to make a nursing cover equivalent to using a recipe to make a PBJ sandwich.  Lots of moms use blankets instead of nursing covers and I've decided that either they are supermoms or they've never had a really active baby before.  Mine was super active, and although I love nursing, I don't love having my breasts exposed to the world.  So here's the solution for that.
Start out with 3cuts of fabric- a 26"x38" one, a 3"x24" one, and a 3"x6" one.  These don't have to be exact, since it's not really going to fit anything, it just has to cover.

You'll also need 12" of boning and two D-rings, shown here.
 First, fold each of the skinny cuts of fabric in on themselves and sew to make straps.  Whatever way you want to do this is fine.
Measure in 13" from each corner of the longer side (this will be the top).  This is where the boning will go, and it should be centered. I just folded the fabric over twice to cover the boning and sewed a nice little rectangle around it.  Make sure the boning curves out towards the front.  Sew the straps on each side (thread the shorter straps through the D-rings).  The next pictures show how it should turn out:

 (the boning is folded away between the straps)
 After that, you just fold the edges in and sew around the whole thing.  I like the boning because it gives you a little peep-hole to check on baby while she is nursing.
 The finished product
Or you could just have your toddler wear it as a cape.

Wednesday, May 25, 2011

great work dress tutorial

As you have probably figured out by now, I love a good deal.  And I also love buying clothes that don't fit (on clearance, obviously) and adjusting them to my size.  This particular dress was on sale for $3.50 at the GAP, but the only one left as 20 sizes too big.   I bought it anyway, figuring that if the alteration didn't work, at least I'd have a good amount of fabric and two zippers to use for other projects.  Turns out I didn't need to worry about that.  I love the way the dress ended up, and the fit is fantastic.

Originally, the dress looked like this.  (Just a tad too big....)


So I turned the dress inside out and traced a pencil skirt onto the inside of the material.  Then I did the same with a well-fitting tshirt.  That gave me a good idea of how much material should be taken off the edges.  (Luckily, for this dress the zipper is in the back.  Taking in on the sides is way easier than trying to take in the back.)


After sewing along the lines I drew, I cut off the excess fabric.  Unfortunately, the neckline was still way too wide, and I wanted to add some sleeves.  Lucky for me, I had plenty of material to work with.  I took some of the excess material and cut out two identical reectangles:


I hemmed one side of the each rectangle and then stitched it into the side of the neckline.  Luckily, this dress already had an asymmetric neckline so precision was not all that important.


I then cut out two curved shapes from some more of extra material.  I hemmed the edge, used a gathering stitch on the top, and stitched them on as sleeves.  (The curved shape helps them fit nicely on the curve of the armhole.)


The final product:  (I got a LOT of compliments on this dress today.  And again, none of my students guessed that I had made it.)


I wore it with a flowered belt (purchased with a gift card from Anthropologie) and purple flowered shoes from Zara in Mexico City.  (I'm not sure if they ever sold these shoes in the US, but I LOVE them.  They add a nice little splash of color to the outfit.